If you have a laptop or a computer where you store sensitive files, you should know that Windows provides foolproof data-protection solutions to protect it from unauthorized access.
Encryption features on Windows devices have been around for a long time, starting with the Windows 2000 operating system that offered Encrypting File System to safeguard device data on hard drives.
More recently, these encryption features have been upgraded to include convenient and potent data protection options, providing BitLocker Device Encryption to full drives as well as portable drives.
It makes encrypted data unreadable to unauthorized users; it can only be decrypted using an encryption key set by authorized personnel.
For IT professionals looking to protect confidential data on their devices, this guide details how you can configure and enable BitLocker Device Encryption On Windows 10 to protect your sensitive data from nefarious attackers.
How to use BitLocker Encryption on Windows 10?
BitLocker is an encryption software solution that can encrypt full system and data drives; it usually takes several hours to one day to deploy BitLocker Encryption to devices, depending on the speed and size of the drive.
Since its release, BitLocker has undergone a slew of upgrades to increase its data protection potency and facilitate ease of use for users. The current version of BitLocker allows Windows 11 and Windows 10 administrators to switch ON BitLocker right from the Windows preinstallation environment.
If you're unfamiliar with BitLocker, there are two encryption methods available to users:
The hardware-based encryption method - which requires a Trusted Platform Module (TPM) security chip.
The software-based encryption method - which can be activated with a password or by using a USB flash drive.
Quick note: Users can enable "BitLocker To Go" on removable media and installation drives for that extra layer of data security.
We'll be going through both methods below:
Enabling BitLocker using hardware-based encryption
Check if your device has TPM support to enable BitLocker
Here are the steps to follow to determine if a computer has TPM support on Windows 10:
Go to Start.
Look for Device Manager.
Navigate to the top result and launch the app.
Go to Security Devices and expand the branch.
Check the version number under "Trusted Platform Module" — it should be version 1.2 or higher for BitLocker to work.
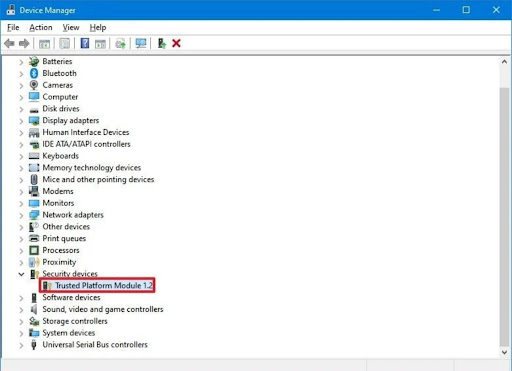
Another way to determine if your computer has TPM support is to visit your manufacturer's website and look for BitLocker details. You will also find instructions on how to enable the security chip.
Quick note: Surface devices usually come with a built-in platform module that offers support for BitLocker encryption.
Enable BitLocker
Go to Start.
Under Control Panel, open the top result.
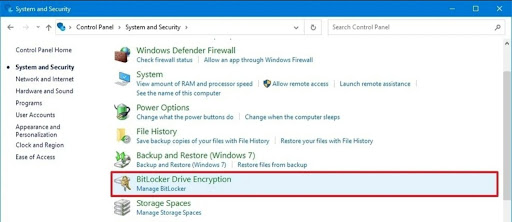
Navigate to System and Security and click on BitLocker Drive Encryption.
4. Go to the "Operating System Drive" section and click on the Turn on BitLocker option.
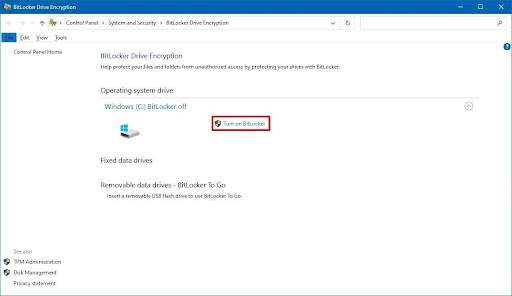
5. Choose where to save the recovery key:
- Save to your Microsoft account.
- Save to a file.
- Print the recovery.
(You can save the recovery key to your OneDrive account and retrieve it later.)
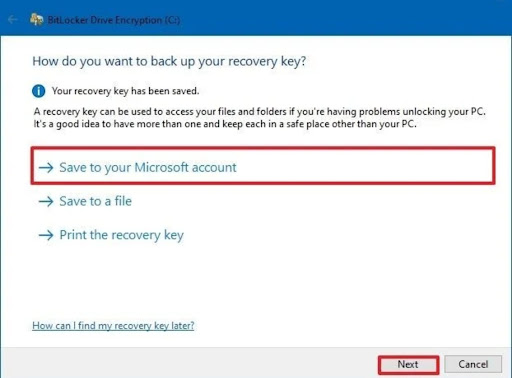
6. Click on Next.
7. Choose how much of your drive space you want to encrypt. There are two options:
Encrypt used disk space only (faster and best for new PCs and drives.)
Encrypt the entire drive (slower but best for PCs and drives already in use.)
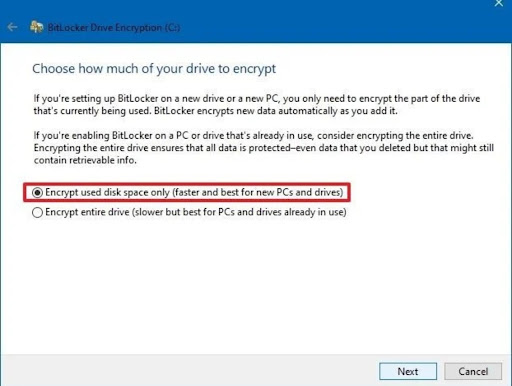
8. Click on Next.
9. Confirm that you are ready to encrypt the device. Click on "Run BitLocker system check" and press Continue.
10. Restart your device.
Once your device is restarted, BitLocker will be enabled.
Note: Your device will boot quickly but BitLocker will continue to encrypt your drive in the background and might take a long time based on the data volume and size. However, this will not hinder your computer usage.
Once BitLocker completes encrypting your device, it will display the "BitLocker ON" label. Following which, you can:
Turn OFF BitLocker: If you want to decrypt your drive, you can turn OFF BitLocker.
Change password: You can create a new password using your current password.
Remove password: This option is possible only if you enable another method of authentication.
Suspend protection: This temporarily freezes file protection, generally when updating your firmware or Windows 10 hardware. It automatically turns ON when your computer is restarted.
Backup your recovery key: If you store your recovery key on your OneDrive account, (step 5) you can create a new backup using this option should you lose the key.
Enabling BitLocker using software-based encryption (without TPM support)
Activate startup authentication with Local Group Policy Editor
If your device does not have the Trusted Platform Module security chip, the only way to encrypt your system files is by using the Local Group Policy Editor which prompts users for authentication at startup.
To do so, you will need a password or USB flash drive to supply the recovery key that will enable Windows 10 to boot.
Here are the steps you should follow:
Go to Start.
Find gpedit.
Navigate to Local Group Policy Editor and open Computer Configuration.
Navigate to Administrative Templates > Windows Components > BitLocker Drive Encryption > Operating System Drives.
You'll find the option "Require additional authentication at startup policy." Double click on it.
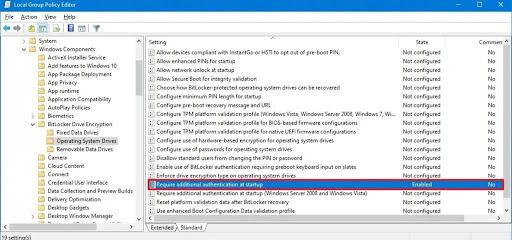
6. Select the Enabled option and check "Allow BitLocker without a compatible TPM (requires a password or a startup key on a USB flash drive.)
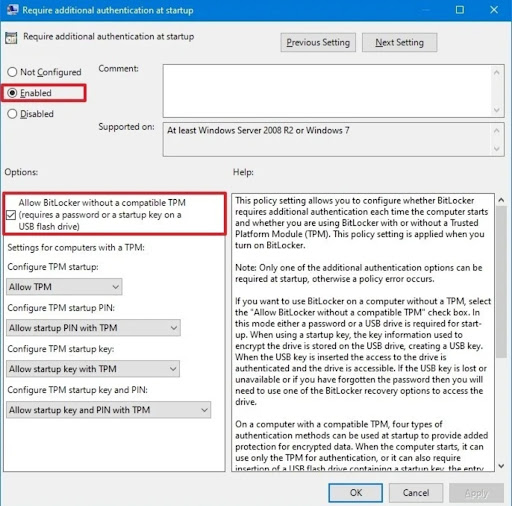
7. Click on OK and continue to configure BitLocker settings.
Enable BitLocker
Navigate to Start and open Control Panel.
Under System and Security, navigate to BitLocker Drive Encryption > Operating System Drive > Turn on BitLocker.
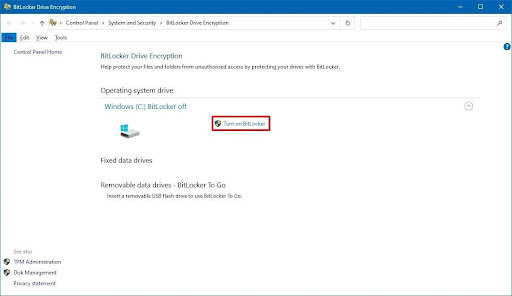
3. Choose the encryption method:
- Insert a USB flash drive.
- Enter a password.
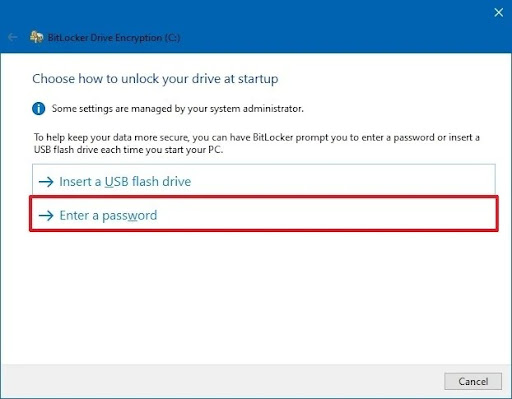
(We recommend using a password.)
4. Create a password to unlock your drive and press Next.
5. Save your recovery key. Choose one of the following options:
- Save to your Microsoft account.
- Save to a USB flash drive.
- Save to a file.
- Print the recovery.
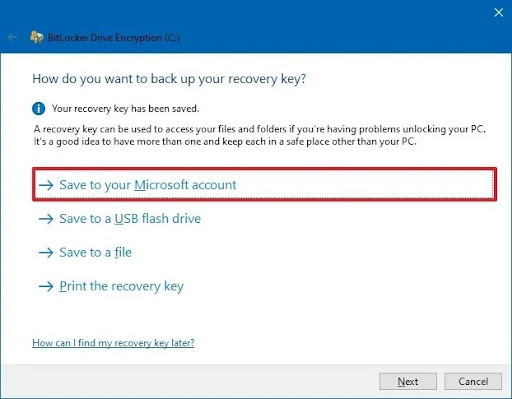
(You can save the recovery key to your OneDrive account and retrieve it later.)
6. Press Next.
7. Choose how much of your drive space you want to encrypt:
- Encrypt used disk space only (faster and best for new PCs and drives).
- Encrypt the entire drive (slower but best for PCs and drives already in use).
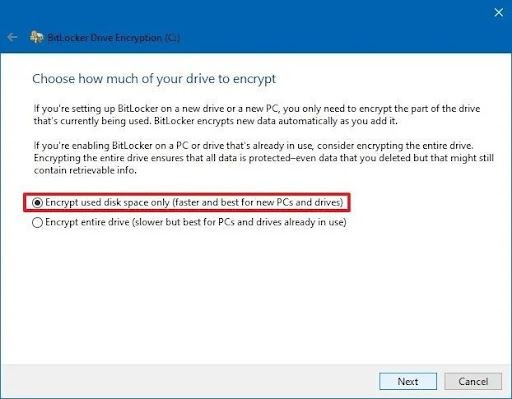
8. Press Next.
9. You'll be prompted to choose the encryption option:
New encryption mode (best for fixed drives on this device.)
Compatible mode (best for drives that can be moved from this device.)
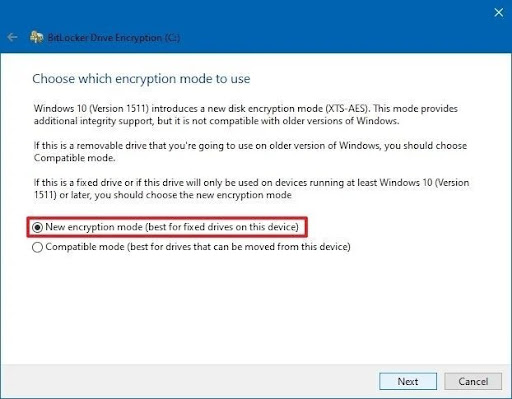
10. Press Next.
11. Confirm you are ready to encrypt the drive and press Continue.
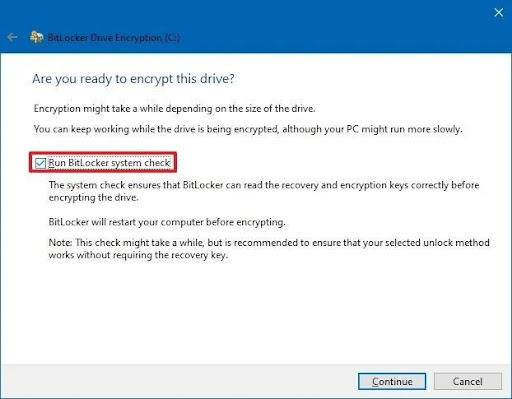
12. Restart your device.
Once BitLocker is enabled on a device, it will prompt users for a decryption PIN before making drive files accessible. This is to prevent users from gaining unauthorized access to your data or modifying existing system files for nefarious purposes.
Your PIN will act as an additional authentication factor which will have to be changed regularly for security. Windows 10 and Windows 11 users can manually change their BitLocker PINs without having to supply administrator credentials, a feature that was absent in earlier Windows versions.
Microsoft BitLocker Administration and Monitoring
With the help of the Microsoft Desktop Optimization Pack (MBAM), users can effortlessly manage BitLocker and BitLocker To Go and provide support as needed. The latest version MBAM 2.5 comes with Service Pack 1, comprising a slew of features:
Offers compatibility with Windows 10 and enables the recovery user experience to be easily customized.
Comprises Microsoft Endpoint Configuration Manage which is a centralized operator used for generating reports and managing data volumes.
Users can leverage the Self-Service Portal to recover encrypted devices.
Allows system administrators to encrypt large volumes of data generated by client enterprises by effectively automating the encryption process.
Windows Enterprise users can rest assured their enterprise data is secure regardless of where they work.
Allows security officers to monitor individual or client computers and instantly ascertain their compliance state. They also have audit access which is a prerequisite for retrieving and recovering sensitive information.
Ensures any policies with respect to BitLocker encryption you set for enterprises are effectively enforced.
Significantly decreases help desk workload by providing support with BitLocker recovery requests.
Allows users to seamlessly integrate with Microsoft Endpoint Configuration Manager and other useful tools to automate management.
Note: BitLocker Device Encryption on Microsoft is enabled using the XTS-AES 128-bit encryption method. If you want to employ another encryption method or configure your cipher strength, you would need to decrypt your encrypted device and apply new settings as needed.
BitLocker Device Encryption: What You Should Know
Before you get started with BitLocker encryption, here are some key details you should be aware of:
BitLocker Drive Encryption is supported by Windows 10 Pro and Enterprise. A version of BitLocker is compatible with Windows 10 (The Home edition has its version of BitLocker but only for select devices.)
BitLocker Drive Encryption requires a Trusted Platform Module (TPM) to activate advanced security features on your device.
If you choose to enable BitLocker using software-based encryption, you will be expected to provide additional authentication (password or flash USB).
Make sure your computer firmware offers in-built support for TPM or USB. Don't have the feature? Reach out to your manufacturer and request the Basic Input Output System (BIOS) or Unified Extensible Firmware Interface (UEFI) update.
Your device should include two partitions — one, for your hard drive files and another, to initiate the installation process. Make sure your hard drive partition has the NTFS file system formatted to it.
Depending on the data volume and type, the encryption process can take time.
Your computer should have an uninterrupted power supply (UPS) while BitLocker encryption is being enabled.
Although it's uncommon, make sure to have a full backup of your system should you run into security risks later.
We hope this exhaustive guide has helped you enable BitLocker on your Windows 10 device. Need more information? Reach out to us

